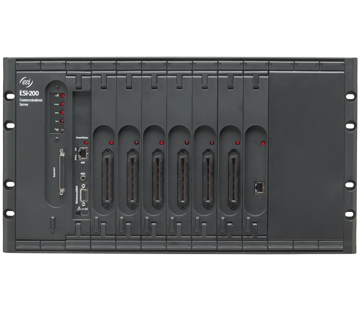
ESI Communication Servers in Monmouth County, NJ
Businesses and organizations throughout Monmouth County and New Jersey can greatly benefit from an ESI communication server. ESI Communication Servers are best communication servers in the industry. The ESI-200 Communications Server is a powerful tool around which you can build your organization’s entire telecommunications strategy — and you don’t have to know it all in advance.
That’s because the ESI-200 can be a traditional digital business phone system, a fully standards-based IP telephony system, or any mix of the two.
The ESI Communications Server combines multiple first-rate, feature-rich systems into one tightly integrated unit:
- Business phone system
- Voice mail
- Automated attendant with six levels and 100 branches
- Messages-on-hold
- Enhanced Caller ID2
- Automatic call distribution (ACD)
- Intelligent Call Forwarding™3
- Optional Windows®-based VIP 7 family of communication management tools
- Optional ESI Presence Management
- Optional ESI Media Management
- Optional ESI Bluetooth® Voice Integration
- Network-based VoIP telephony1
Properly configured by your Certified ESI Reseller, the ESI-200 can handle your heaviest communications needs. In addition to the features mentioned above, the ESI-200 includes:
- Digital stations, IP stations1 (including SIP), or any combination thereof
- T1/PRI support 1
- Massive voice message storage
- Sophisticated voicemail features
Communication Servers in Monmouth County: ESi-200 FAQ
How do I reset the phone system’s clock?
In order to reset the clock, you must have Administrator password access to the system. (Detailed instructions can be found in the Administrator’s Manual under Function 1-4).Current ESI phone systems can be configured to reset the time automatically when Daylight Saving Time (DST) ends or begins each year. However, if your system is not configured that way (or if it doesn’t support automatic time change), the following instructions explain how to reset the time and date manually.
- On any ESI phone within the system, press PROG/HELP or PROGRAM. The normal station programming menu prompt will begin to play.
- Stop the prompt by pressing HOLD.
- Enter the Administrator password and then press #.
- Access Function 1-4 by pressing 1 followed by 4. If the system prompts you to press 1 to set time and date, do so.
- Enter a new time using a twelve-hour format and then press #. For example: Enter 1 2 3 3 # for 12:33 or 3 1 5 # for 3:15.
- Select AM or PM by pressing a scroll key and then #.
- When the date appears, either:
Press # to accept the currently displayed date as correct; or enter a new date in an eight-digit format, including leading zeroes, then press #.
Example: for December 31, 2012, enter 1 2 3 1 2 0 1 2 # (be sure to enter any leading zeroes).
Hang up to finish the entry.
(Note: This procedure will not work on ESI Communications systems manufactured before February, 2003. If you don’t know which ESI system you have, consult your ESI Reseller).
This feature, when enabled, causes the phone system’s real-time clock to adjust itself automatically for Daylight Saving Time. The options are AUTO [enabled] and DISABLE (the latter is best for counties or states that don’t observe DST).
To set this feature:
- On any ESI phone within the system, press PROG/HELP or PROGRAM key. The normal station programming menu prompt will begin to play.
- Stop the prompt by pressing HOLD.
- Enter the Administrator password and then press #.
- Access Function 1-4-2 by pressing 1 4 2 and then #.
- The phone display will show AUTO TIME SET, and either ENABLED or DISABLED. If necessary, use the phone’s scroll keys (up/down arrows) to toggle between the two settings. We recommend the ENABLEDsetting. When the display shows the setting you want, press #.
- The phone display will now show DAYLIGHT SAVING, and either AUTO or DISABLED. If necessary, use the phone’s scroll keys to toggle between the two settings.
- If you want your phone system to adjust its clock setting automatically whenever your time changes between Daylight Saving Time and Standard Time, select AUTO. If you live in an area which doesn’t observe Daylight Saving Time, select DISABLED.
- When the display shows the setting you want, press # # and hang up.
In order to reset the clock, you must have Administrator password access to the system. (Detailed instructions can be found in the Administrator’s Manual under Function 1-6).
- On any ESI phone within the system, press PROG/HELP or PROGRAM.
- Stop the prompt by pressing HOLD.
- Enter the Administrator password and then press #.
- Access Function 6-1 by pressing 6 1.
- After the prompt, press 5 4 0 to select system prompt 540, which is the holiday greeting.
If you have already recorded the holiday greeting, the system will play it for you.
If you are satisfied with the currently recorded holiday greeting, skip to step 8. - To record the holiday greeting, press 1. This will replace any existing recording.
The system will then prompt you through the normal recording of the holiday greeting.
When finished, press #. The system will then play back the newly recorded holiday greeting. - To keep the recording, press # to accept; if not, go back to step 6.
- Press # again to accept the holiday greeting.
This is the greeting that now will play when your system is put in holiday mode through the use of a programmed Day/Night key.
How do I make and receive calls on my ESI desktop phone?
Receiving and placing calls is easy with an ESI Feature Phone.
To answer a call, lift the handset just like you would your home phone, or use the built-in speakerphone by pressing the SPEAKER key. To end your call, simply replace the handset or press the RELEASE key.
To place a call, lift the handset or press the SPEAKER key. Once the SPEAKER key is pressed, the speakerphone will automatically become activated.
- To reach a co-worker, dial his or her extension or press one of the pre-programmed keys on your phone. Remember, keys may be programmed for an individual, a group of people (like the Sales team), or another company location across town, or across the country.
- To place an outside call, press an idle LINE key or dial your company’s required access code (commonly the number 9). Once you hear dial tone, just dial the phone number of the person you are trying to reach.
End your call by replacing the handset or pressing the RELEASE key.
Here’s a tip: If you need to switch from the handset to the speakerphone, press the SPEAKER key while still on the call, then replace the handset. To switch from the speakerphone to the handset, just pick up the handset and the call will be switched automatically.
How do I record my personal greeting with ESI communication servers?
Follow these steps to record your personal greeting
- On your ESI phone, press PROG/HELP or PROGRAM.
- Press Function 1, Personal Greeting.
- If prompted, enter your station password.
- Select the desired greeting — 1, 2 or 3. The system will play the current greeting, followed by prompts to re-record, delete or hear again — or confirm the current greeting by pressing #.
- Press 1 to record personal greeting — Begin recording at the tone. Press 1 to stop. The new personal greeting automatically replaces the previous greeting.
- Press 2 to delete the personal greeting — When prompted, press 2 again to confirm
Warning: Your mailbox is disabled if no personal greeting exists. Never delete all of your existing personal greetings before you record at least one new one. - Press 3 to hear your personal greeting
Video
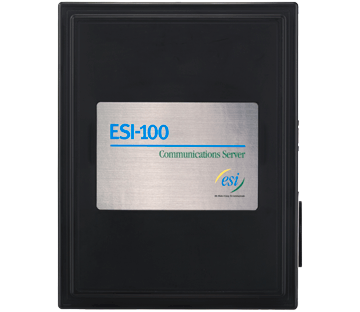
Communications Server installations in Monmouth County: ESI-100
ESI Communication Servers are a perfect match for any small business in Monmouth County. They are powerful tools around which you can build your organization’s entire telecommunications strategy. The ESI-100 Communications Server is so easy to operate you don’t have to know it all in advance.
That’s because the ESI-100 can be a traditional digital business phone system, a fully standards-based IP telephony system, or any mix of the two.
The ESI-100 Communications Server combines multiple first-rate, feature-rich systems into one tightly integrated unit:
- Business phone system
- Voicemail
- Automated attendant with six levels and 100 branches
- Messages-on-hold
- Enhanced Caller ID2
- Automatic call distribution (ACD)
- Intelligent Call Forwarding™3
- Optional Windows®-based VIP 7 family of communication management tools
- Optional ESI Presence Management
- Optional ESI Media Management
- Optional ESI Bluetooth® Voice Integration
- Network-based VoIP telephony1
Properly configured by your Certified ESI Reseller, the ESI-100 can handle your heaviest communications needs. In addition to the features mentioned above, the ESI-100 includes:
- Digital stations, IP stations1 (including SIP), or any combination thereof
- T1/PRI support
- Massive voice message storage
- Sophisticated voicemail features
ESI Communication Servers FAQs – ESI-100
How do I reset the phone system’s clock?
In order to reset the clock, you must have Administrator password access to the system. (Detailed instructions can be found in the Administrator’s Manual under Function 1-4).
Current ESI phone systems can be configured to reset the time automatically when Daylight Saving Time (DST) ends or begins each year. However, if your system is not configured that way (or if it doesn’t support automatic time change), the following instructions explain how to reset the time and date manually.
- On any ESI phone within the system, press PROG/HELP or PROGRAM. The normal station programming menu prompt will begin to play.
- Stop the prompt by pressing HOLD.
- Enter the Administrator password and then press #.
- Access Function 1-4 by pressing 1 followed by 4. If the system prompts you to press 1 to set time and date, do so.
- Enter a new time using a twelve-hour format and then press #. For example: Enter 1 2 3 3 # for 12:33 or 3 1 5 # for 3:15.
- Select AM or PM by pressing a scroll key and then #.
- When the date appears, either:
Press # to accept the currently displayed date as correct;
or
Enter a new date in an eight-digit format, including leading zeroes, then press #. Example:
For December 31, 2012, enter 1 2 3 1 2 0 1 2 # (be sure to enter any leading zeroes).
- Hang up to finish the entry.
Automatic adjustment for Daylight Saving Time
(Note: This procedure will not work on ESI systems manufactured before February, 2003. If you don’t know which ESI system you have, consult your ESI Reseller).
This feature, when enabled, causes the phone system’s real-time clock to adjust itself automatically for Daylight Saving Time. The options are AUTO [enabled] and DISABLE (the latter is best for counties or states that don’t observe DST).
To set this feature:
- On any ESI phone within the system, press PROG/HELP or PROGRAM key. The normal station programming menu prompt will begin to play.
- Stop the prompt by pressing HOLD.
- Enter the Administrator password and then press #.
- Access Function 1-4-2 by pressing 1 4 2 and then #.
- The phone display will show AUTO TIME SET, and either ENABLED or DISABLED. If necessary, use the phone’s scroll keys (up/down arrows) to toggle between the two settings. We recommend the ENABLEDsetting. When the display shows the setting you want, press #.
- The phone display will now show DAYLIGHT SAVING, and either AUTO or DISABLED. If necessary, use the phone’s scroll keys to toggle between the two settings.
- If you want your phone system to adjust its clock setting automatically whenever your time changes between Daylight Saving Time and Standard Time, select AUTO. If you live in an area which doesn’t observe Daylight Saving Time, select DISABLED.
- When the display shows the setting you want, press # # and hang up.
Recording your ESI system’s holiday greeting
In order to reset the clock, you must have Administrator password access to the system. (Detailed instructions can be found in the Administrator’s Manual under Function 1-6).
- On any ESI phone within the system, press PROG/HELP or PROGRAM.
- Stop the prompt by pressing HOLD.
- Enter the Administrator password and then press #.
- Access Function 6-1 by pressing 6 1.
- After the prompt, press 5 4 0 to select system prompt 540, which is the holiday greeting.
If you have already recorded the holiday greeting, the system will play it for you.
If you are satisfied with the currently recorded holiday greeting, skip to step 8. - To record the holiday greeting, press 1. This will replace any existing recording.
The system will then prompt you through the normal recording of the holiday greeting.
When finished, press #. The system will then play back the newly recorded holiday greeting. - To keep the recording, press # to accept; if not, go back to step 6.
- Press # again to accept the holiday greeting.
This is the greeting that now will play when your system is put in holiday mode through the use of a programmed Day/Night key.
How do I make and receive calls on my ESI desktop phone?
Receiving and placing calls is easy with an ESI Feature Phone.
To answer a call, lift the handset just like you would your home phone, or use the built-in speakerphone by pressing the SPEAKER key. To end your call, simply replace the handset or press the RELEASE key.
To place a call, lift the handset or press the SPEAKER key. Once the SPEAKER key is pressed, the speakerphone will automatically become activated.
- To reach a co-worker, dial his or her extension or press one of the pre-programmed keys on your phone. Remember, keys may be programmed for an individual, a group of people (like the Sales team), or another company location across town, or across the country.
- To place an outside call, press an idle LINE key or dial your company’s required access code (commonly the number 9). Once you hear dial tone, just dial the phone number of the person you are trying to reach.
End your call by replacing the handset or pressing the RELEASE key.
Here’s a tip: If you need to switch from the handset to the speakerphone, press the SPEAKER key while still on the call, then replace the handset. To switch from the speakerphone to the handset, just pick up the handset and the call will be switched automatically.
How do I record my personal greeting?
Follow these steps to record your personal greeting
- On your ESI phone, press PROG/HELP or PROGRAM.
- Press Function 1, Personal Greeting.
- If prompted, enter your station password.
- Select the desired greeting — 1, 2 or 3. The system will play the current greeting, followed by prompts to re-record, delete or hear again — or confirm the current greeting by pressing #.
- Press 1 to record personal greeting — Begin recording at the tone. Press 1 to stop. The new personal greeting automatically replaces the previous greeting.
- Press 2 to delete the personal greeting — When prompted, press 2 again to confirm
Warning: Your mailbox is disabled if no personal greeting exists. Never delete all of your existing personal greetings before you record at least one new one. - Press 3 to hear your personal greeting
Video
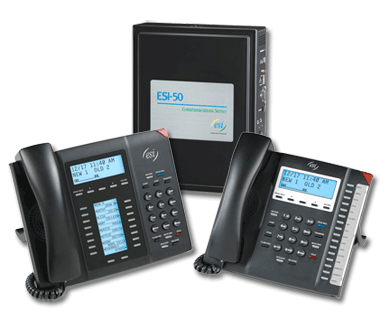
ESI-50 Communications Server For Sale in Monmouth County
For any small business in Monmouth County looking for an office system that can be digital, IP, or both, the ESI-50 packs an amazing wallop for its size. The ESI-50 Communications Server is a powerful tool around which you can build your organization’s entire telecommunications strategy — and you don’t have to know it all in advance. That’s because the ESI-50 can be a traditional digital business phone system, a fully standards-based IP telephony system, or any mix of the two.
The ESI-50 Communications Server combines multiple first-rate, feature-rich systems into one tightly integrated unit:
- Business phone system
- Voicemail
- Automated attendant with six levels and 100 branches
- Messages-on-hold
- Enhanced Caller ID2
- Automatic call distribution (ACD)
- Intelligent Call Forwarding™3
- Optional Windows®-based VIP family of communication management tools
- Optional ESI Presence Management
- Optional ESI Media Management
- Optional ESI Bluetooth® Voice Integration
- Network-based VoIP telephony1
Properly configured by your Certified ESI Reseller, the ESI-50 can handle your heaviest communications needs. In addition to the features mentioned above, the ESI-50 includes:
- Digital stations, IP stations1 (including SIP), or any combination thereof
- T1/PRI support 4
- Massive voice message storage
- Sophisticated voicemail features
ESI Communication Servers FAQs – ESI-50
How do I reset the phone system’s clock?
In order to reset the clock, you must have Administrator password access to the system. (Detailed instructions can be found in the Administrator’s Manual under Function 1-4).
Current ESI communication servers systems can be configured to reset the time automatically when Daylight Saving Time (DST) ends or begins each year. However, if your system is not configured that way (or if it doesn’t support automatic time change), the following instructions explain how to reset the time and date manually.
- On any ESI phone within the system, press PROG/HELP or PROGRAM. The normal station programming menu prompt will begin to play.
- Stop the prompt by pressing HOLD.
- Enter the Administrator password and then press #.
- Access Function 1-4 by pressing 1 followed by 4. If the system prompts you to press 1 to set time and date, do so.
- Enter a new time using a twelve-hour format and then press #. For example: Enter 1 2 3 3 # for 12:33 or 3 1 5 # for 3:15.
- Select AM or PM by pressing a scroll key and then #.
- When the date appears, either:
Press # to accept the currently displayed date as correct;
or
Enter a new date in an eight-digit format, including leading zeroes, then press #. Example:
For December 31, 2012, enter 1 2 3 1 2 0 1 2 # (be sure to enter any leading zeroes).
- Hang up to finish the entry.
Automatic adjustment for Daylight Saving Time
(Note: This procedure will not work on ESI Communications systems manufactured before February, 2003. If you don’t know which ESI Communications system you have, consult your ESI Reseller).
This feature, when enabled, causes the phone system’s real-time clock to adjust itself automatically for Daylight Saving Time. The options are AUTO [enabled] and DISABLE (the latter is best for counties or states that don’t observe DST).
To set this feature:
- On any ESI phone within the system, press PROG/HELP or PROGRAM key. The normal station programming menu prompt will begin to play.
- Stop the prompt by pressing HOLD.
- Enter the Administrator password and then press #.
- Access Function 1-4-2 by pressing 1 4 2 and then #.
- The phone display will show AUTO TIME SET, and either ENABLED or DISABLED. If necessary, use the phone’s scroll keys (up/down arrows) to toggle between the two settings. We recommend the ENABLEDsetting. When the display shows the setting you want, press #.
- The phone display will now show DAYLIGHT SAVING, and either AUTO or DISABLED. If necessary, use the phone’s scroll keys to toggle between the two settings.
- If you want your phone system to adjust its clock setting automatically whenever your time changes between Daylight Saving Time and Standard Time, select AUTO. If you live in an area which doesn’t observe Daylight Saving Time, select DISABLED.
- When the display shows the setting you want, press # # and hang up.
Recording your ESI system’s holiday greeting
In order to reset the clock, you must have Administrator password access to the system. (Detailed instructions can be found in the Administrator’s Manual under Function 1-6).
- On any ESI phone within the system, press PROG/HELP or PROGRAM.
- Stop the prompt by pressing HOLD.
- Enter the Administrator password and then press #.
- Access Function 6-1 by pressing 6 1.
- After the prompt, press 5 4 0 to select system prompt 540, which is the holiday greeting.
If you have already recorded the holiday greeting, the system will play it for you.
If you are satisfied with the currently recorded holiday greeting, skip to step 8. - To record the holiday greeting, press 1. This will replace any existing recording.
The system will then prompt you through the normal recording of the holiday greeting.
When finished, press #. The system will then play back the newly recorded holiday greeting. - To keep the recording, press # to accept; if not, go back to step 6.
- Press # again to accept the holiday greeting.
This is the greeting that now will play when your system is put in holiday mode through the use of a programmed Day/Night key.
How do I make and receive calls on my ESI desktop phone?
Receiving and placing calls is easy with an ESI Feature Phone.
To answer a call, lift the handset just like you would your home phone, or use the built-in speakerphone by pressing the SPEAKER key. To end your call, simply replace the handset or press the RELEASE key.
To place a call, lift the handset or press the SPEAKER key. Once the SPEAKER key is pressed, the speakerphone will automatically become activated.
- To reach a co-worker, dial his or her extension or press one of the pre-programmed keys on your phone. Remember, keys may be programmed for an individual, a group of people (like the Sales team), or another company location across town, or across the country.
- To place an outside call, press an idle LINE key or dial your company’s required access code (commonly the number 9). Once you hear dial tone, just dial the phone number of the person you are trying to reach.
End your call by replacing the handset or pressing the RELEASE key.
Here’s a tip: If you need to switch from the handset to the speakerphone, press the SPEAKER key while still on the call, then replace the handset. To switch from the speakerphone to the handset, just pick up the handset and the call will be switched automatically.
How do I record my personal greeting?
Follow these steps to record your personal greeting
- On your ESI phone, press PROG/HELP or PROGRAM.
- Press Function 1, Personal Greeting.
- If prompted, enter your station password.
- Select the desired greeting — 1, 2 or 3. The system will play the current greeting, followed by prompts to re-record, delete or hear again — or confirm the current greeting by pressing #.
- Press 1 to record personal greeting — Begin recording at the tone. Press 1 to stop. The new personal greeting automatically replaces the previous greeting.
- Press 2 to delete the personal greeting — When prompted, press 2 again to confirm
Warning: Your mailbox is disabled if no personal greeting exists. Never delete all of your existing personal greetings before you record at least one new one. - Press 3 to hear your personal greeting
Video
ESI Communication Servers in Monmouth County, NJ: We Have the Experience You’re Looking For
Our technicians are well trained in structure communication server standards. If your small business is looking for a powerful tool in which you can build an effective telecommunications strategy, then give us a call. We are based out of Monmouth County, NJ. Contact us and see how we can serve you!